Scommerce Mage team is big fan of using queuing system because it offloads big tasks and give performance boost to your website. Imagine if someone is placing order on your website and you are doing the following tasks at the same time while customer is waiting for the order confirmation page
- Creating Order
- Taking Payment
- Creating Invoice
- Deducting Stock
- Sending Email to admin and customer
- Sending data to analytics like Google or Facebook or many others
- Sending order data to your CRM/ERP systems and waiting for the response
Do you think your customers will wait for that long or is it worth doing all the above tasks in real time when you can easily offload most of them?
Even adding a fraction of time to completing the order can reduce your Ecommerce conversion rate. Have you ever seen big sites like Amazon taking time to process your order? It is instant but you must be wondering how, they use event based architecture, none of the tasks on their website is happening real time. All the massive tasks goes into queues and get processed afterwards, this process is called asynchronous messaging.
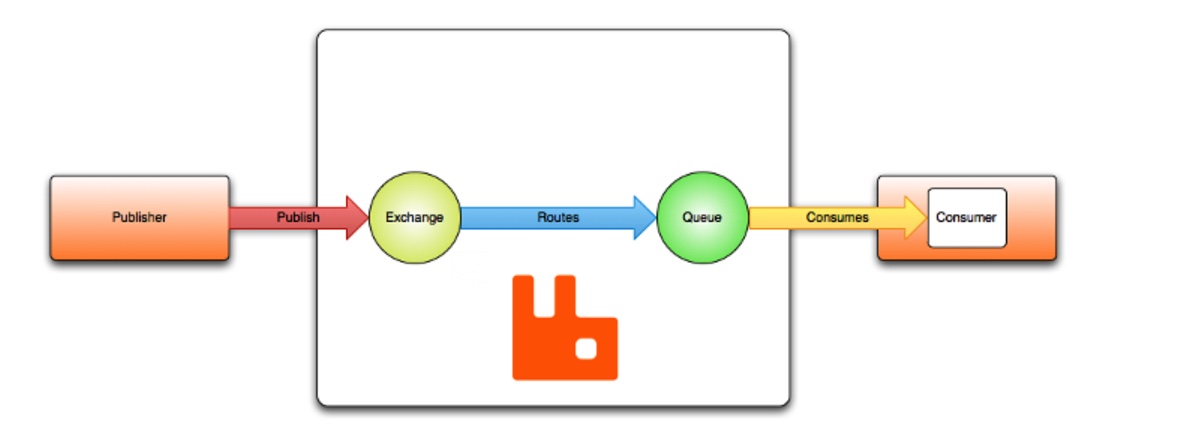
Asynchronous messaging system
Asynchronous messaging system consists of two major elements Publisher and Consumer. Publisher publishes the message in the queue and consumer consumes those messages from the queue for further processing. For example, once the order is ready to be placed, publisher can send order id to the queue. And then consumer will pick the order id and get all the relevant information from order table to perform all the tasks mentioned in the list above. This way customer will see the order confirmation page in fraction of seconds instead of minutes. This ensures you to process thousands of orders in peak season like Boxing Day, Xmas day etc.
Here you can see the basic diagram below to see how the queuing system works -:
Anyway know you have a basic understanding of why to use queuing system, let’s crack on with how to build queuing system in Magento 2 community edition. As usual here is our step by step guide to help you implement RabbitMQ in your Magento 2 store.
Step 1 – Install two modules Magento 2 Message Queue Module and Magento 2 Message Queue AMQP Broker Implementation
You can install them using composer or download them directly from GitHub
Magento 2 Message Queue Module
composer require renatocason/magento2-module-mq
Magento 2 Message Queue AMQP Broker Implementation
composer require renatocason/magento2-module-mq-amqp
Once they are installed run the following commands to enable the module -:
bin/magento module:enable Rcason_Mq
bin/magento module:enable Rcason_MqAmqp
bin/magento setup:upgrade
Step 2 – Install rabbitMQ on your server or local machine using the following link https://www.rabbitmq.com/download.html
Step 3 – Configure the AMQP connection in your app\etc\env.php file
'ce_mq' => [
      'amqp' => [
          'host' => 'localhost',
          'port' => 5672,
          'username' => 'guest',
          'password' => 'guest',
          'virtualhost' => '/',
      ],
  ],
Step 4 – Check the correct configuration of your queue(s) by using the following command -:
bin/magento ce_mq:queues:list
This will ensures you that both the above modules are working fine.
Step 5 – Implementation of RabbitMQ in your custom Magento 2 module
5.1 Specify amqp as broker when configuring a queue in your module’s etc/ce_mq.xml file
<config xmlns:xsi="http://www.w3.org/2001/XMLSchema-instance" xsi:noNamespaceSchemaLocation="urn:magento:module:Rcason_Mq:etc/ce_mq.xsd">
    <ceQueue name="product.updates" broker="amqp" messageSchema="int" consumerInterface="Scommerce\MqExample\Model\ExampleConsumer"/>
</config>
Important things to note here are as follows
Broker – – This could be AMQP or MySQL, our recommendation is to use AMQP because it doesn’t put a lot of burden on your DB.
Message Schema – – This could be int or string (could be json encoded string)
Name – – This is user defined name of the queue
Consumer Interface – This is the main class to perform tasks based on data received from publish function.
5.2 Require the publisher in the classes you need it
/**
 * @param \Rcason\Mq\Api\PublisherInterface $publisher
 */
public function __construct(
    \Rcason\Mq\Api\PublisherInterface $publisher
) {
    $this->publisher = $publisher;
}
5.3 Use it to queue messages
$this->publisher->publish('product.updates', $productId);
5.4 Implement your consumer under
class ExampleConsumer implements \Rcason\Mq\Api\ConsumerInterface
{
    /**
     * {@inheritdoc}
     */
    public function process($productId)
    {
        // Your code here
    }
}
Once all the above being done then run the following command -:
bin/magento setup:upgrade
N.B – You have to run setup:upgrade every time you change anything in your code.
You can start your consumer using the following command -:
bin/magento ce_mq:consumers:start product.updates
Looking for real world example where we are using this, have a look at our brand new module Magento 2 JDA Integration which uses a lot of queues to send orders, send product, synch stock, send purchase order and many more.
Hope this article helped you in some way. Please leave us your comment and let us know what do you think? Thanks.