
Google Analytics (Universal Analytics) received a huge update in the form of GA4 (Google Analytics 4). It’s been an year since its release and it has completely changed the Analytics as we knew once. Google has finally decided to stop processing DATA under Universal Analytics i.e Only GA4 is the option now. Now it’s time to shift to Magento 2 GA4. It is improved in several ways as to its predecessor. Previously we had to run both Universal and GA4 analytics parallelly because GA4 was still under beta development. Now you can run GA4 independently. The good news is, in case you are using our GTM Pro extension for Enhanced Ecommerce tracking then you can set up Magento 2 GA4 in no time. It is compatible with both Hyvä theme and Breeze theme. The only thing you need to do is download the latest version of our extension and import the GA4 JSON provided in your existing GTM account. Don’t worry even if you are not using our extension, please follow the below article and implement data layers to your website using official documentation provided by Google for GA4. As usual, we are going to continue with our step-by-step guide to help you achieve GA4 on your website.
Steps to Setup Magento 2 GA4 (Google Analytics 4) with GTM
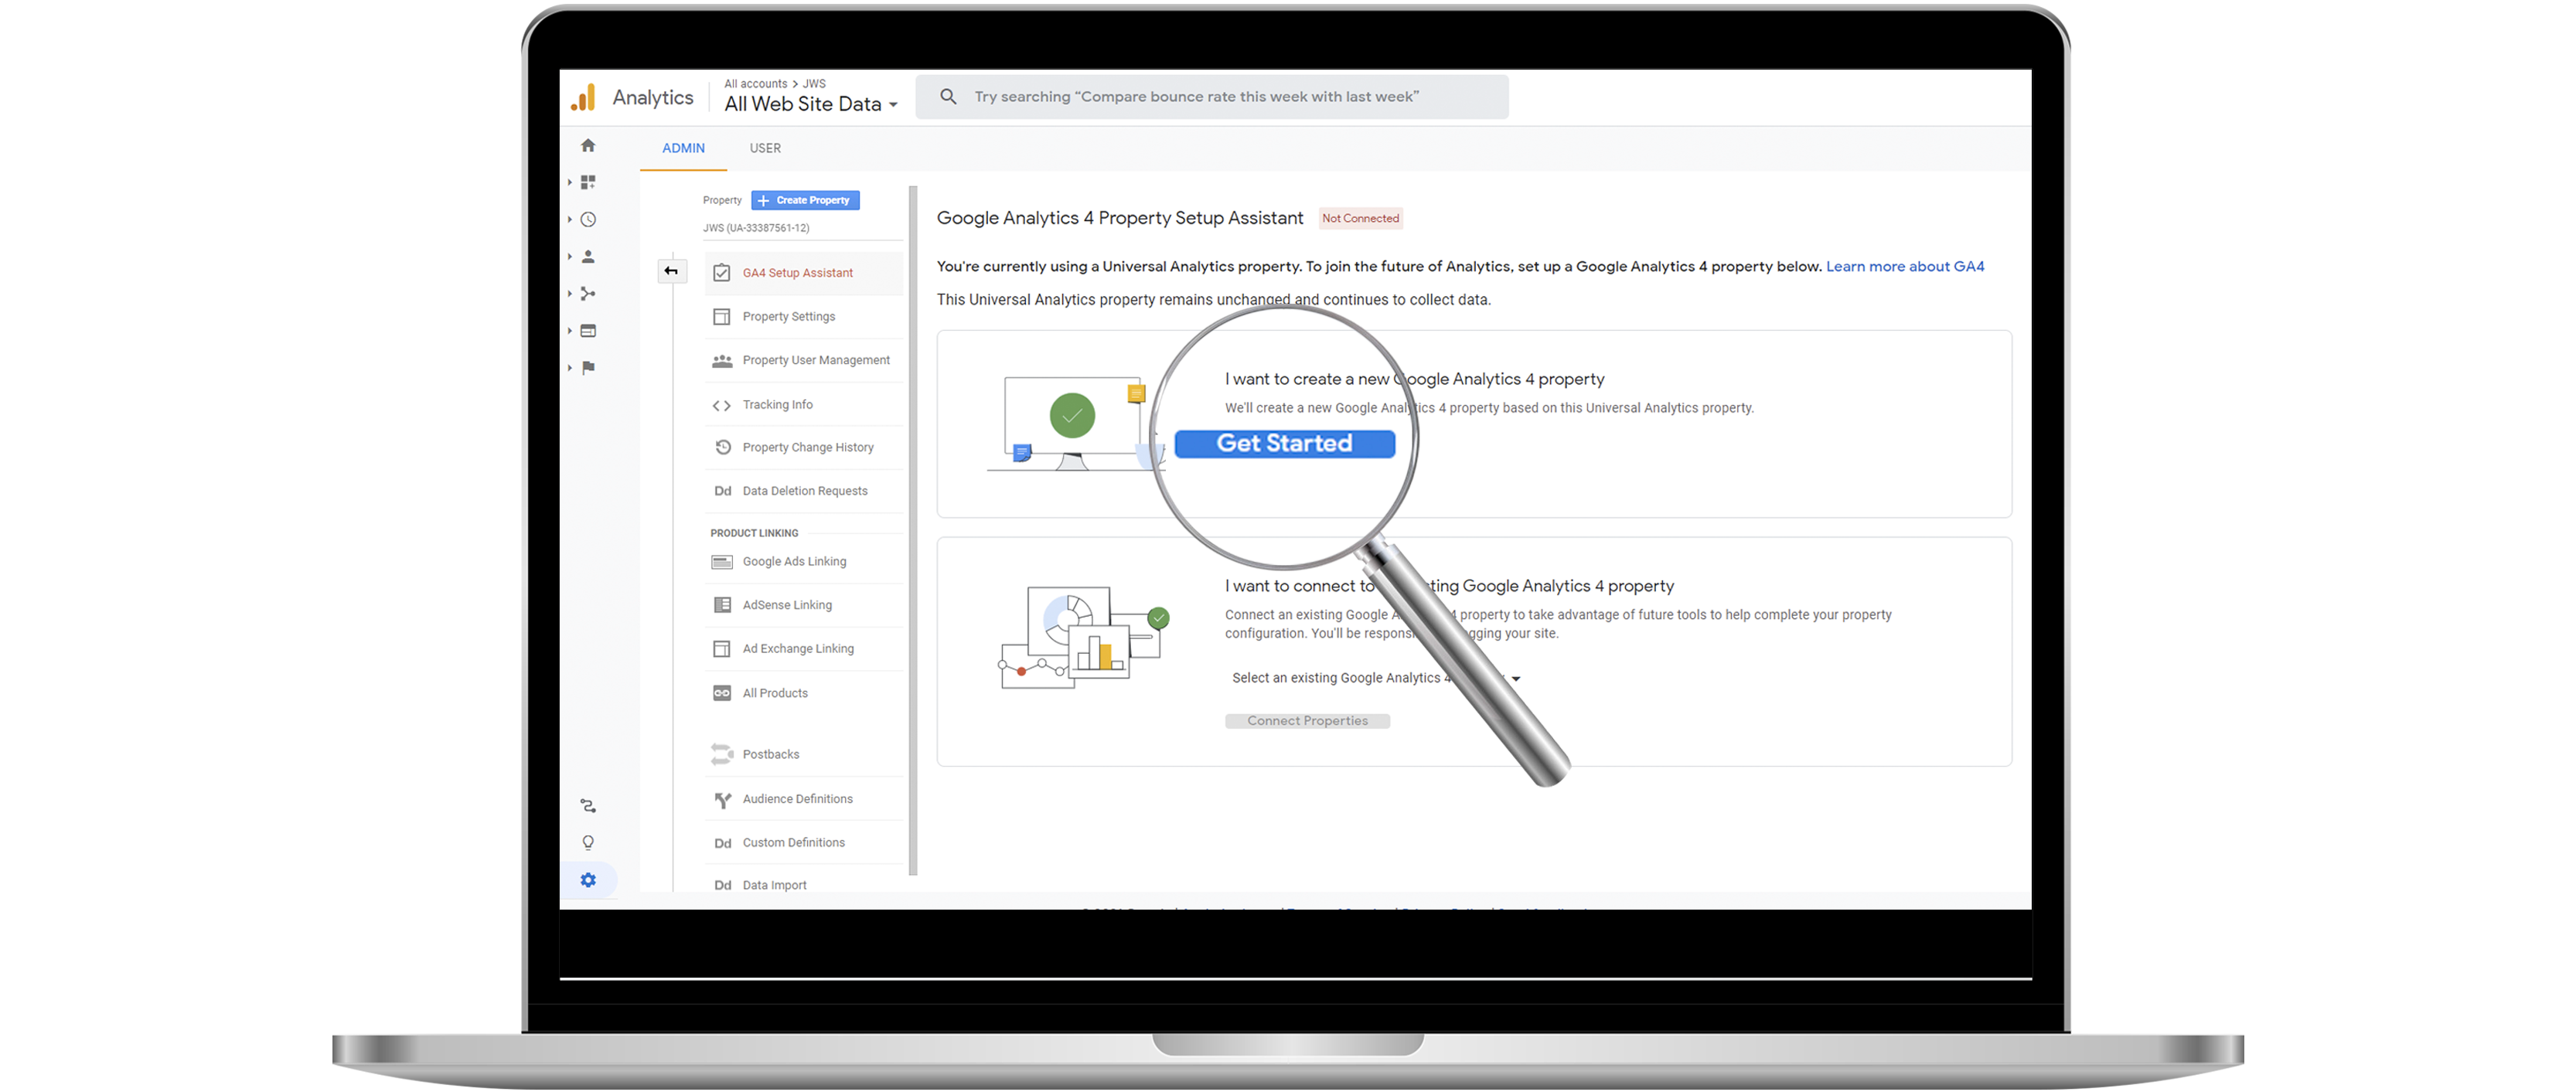
Step 1:- For Magento 2 GA4 set up, the very first thing you will need to do is to open your universal analytics panel. Then go into the admin settings. Here you will see the GA4 Setup Assistant button. Click on that button then click on get started.

Step 2:- Now click on Get Started to create a new property. Click on it.
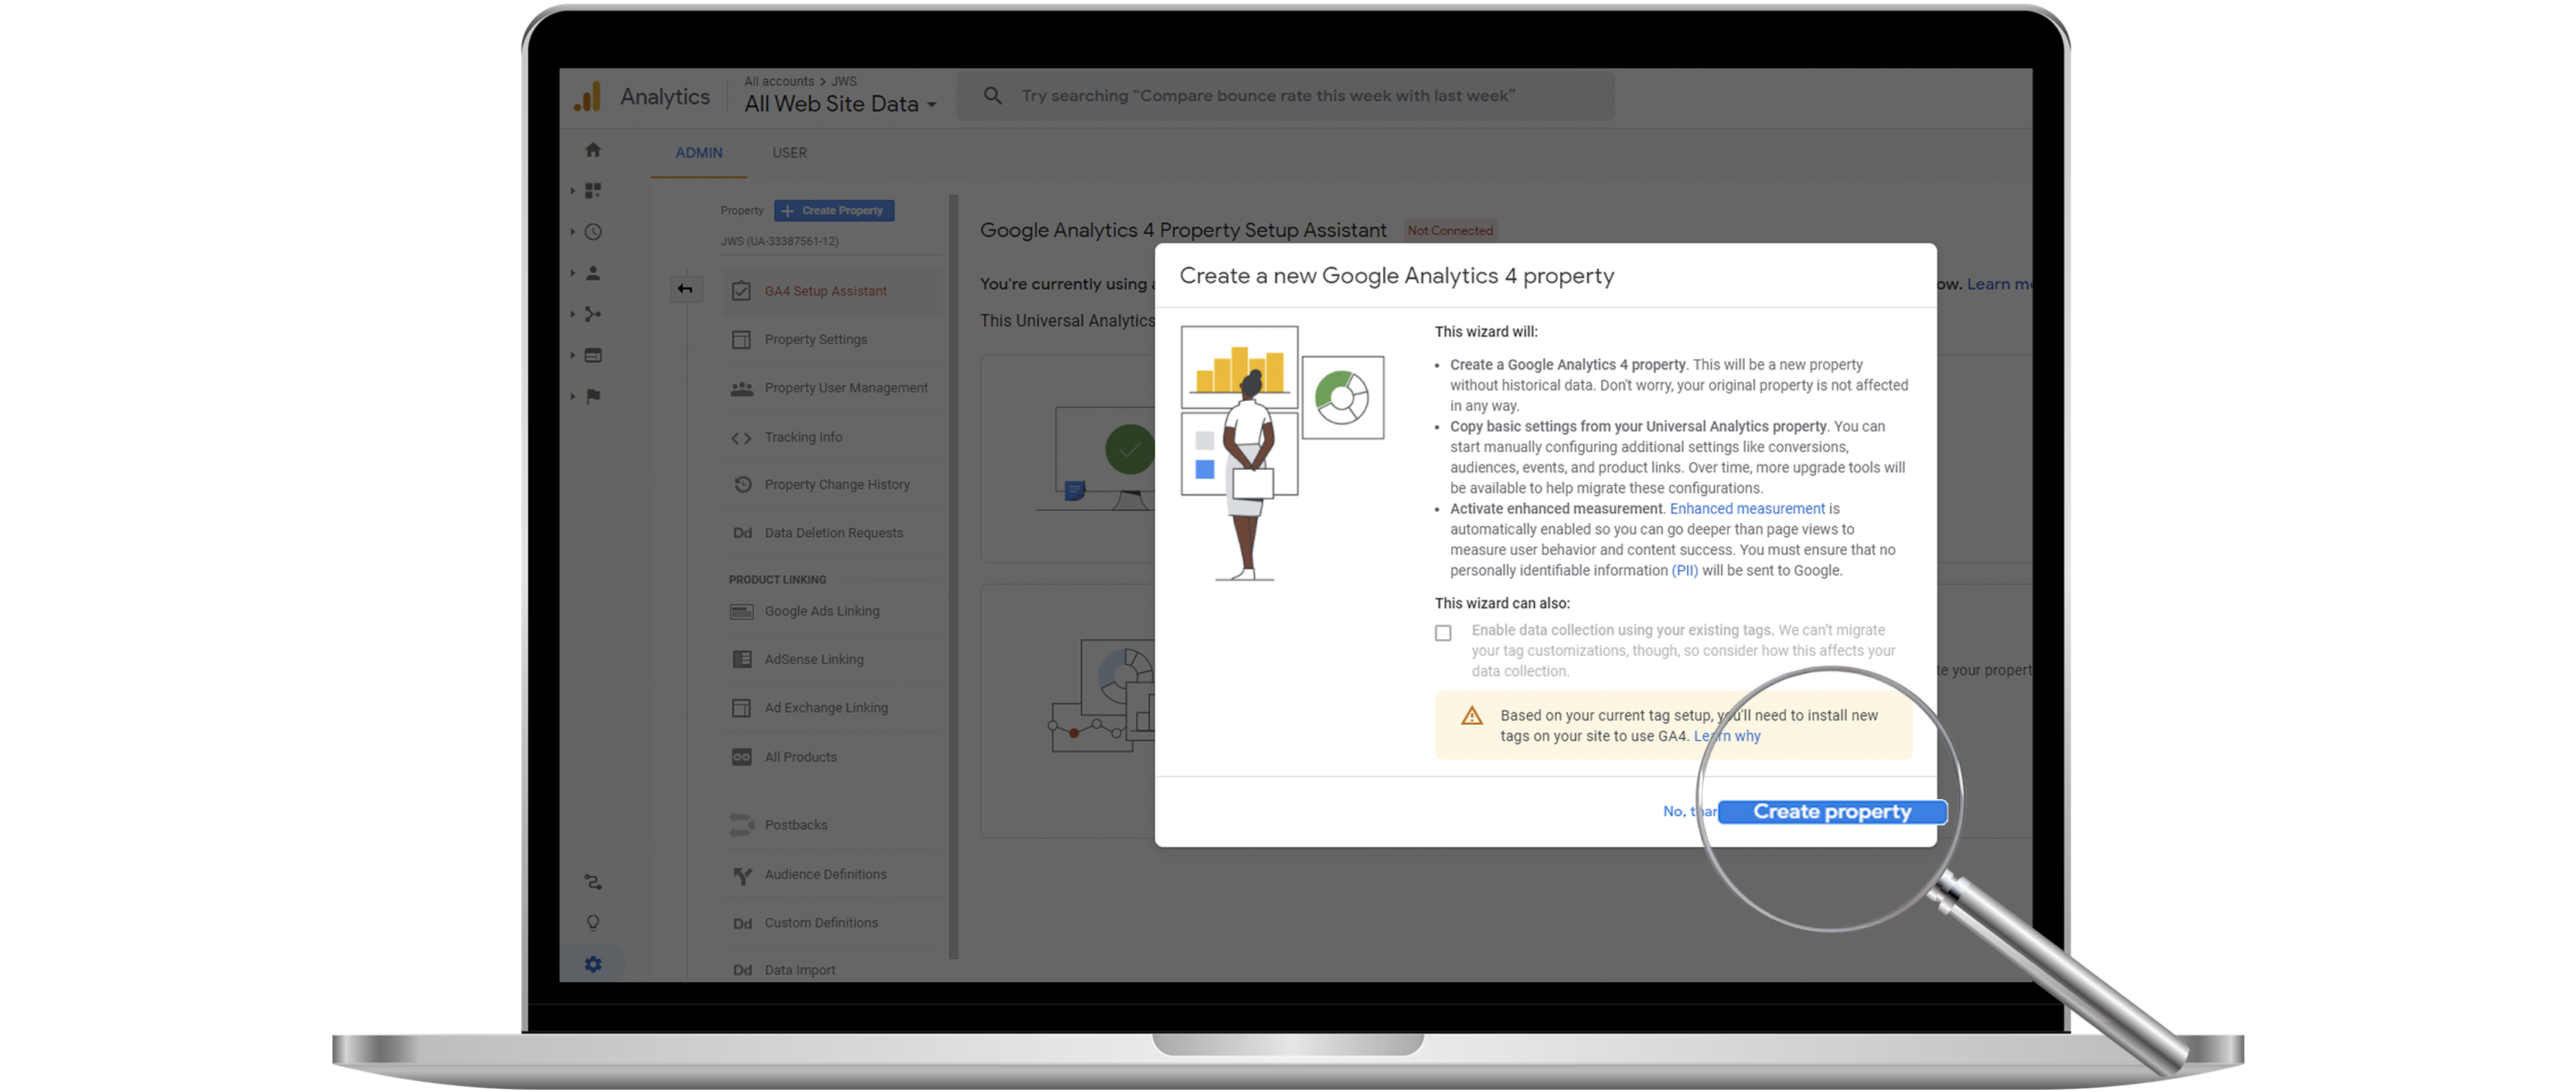
Step 3:- Now click on Create Property to create a new Google Analytics 4 property.
Step 4:- Once you have your property created you will see the new GA4 view. Now you will see the setup assistant on your screen. Moreover, it actually pulls all the settings from your universal analytics so you don’t need to do the extra work. Here you can customize your GA4 depending upon your requirements. To setup Magento 2 GA4(Google Analytics 4) we will have to connect this view to the GTM.
Using Google Tag Manager(GTM) to Implement Magento 2 GA4(Google Analytics 4)
You can easily implement GA4 property using the Google Tag Manager that we created in the previous steps. Follow the steps below:-
Step 1:- Browse your Google Tag Manager page. Create a new configuration tag. A popup will open on your screen. As you can see we need the measurement ID. You can get this ID in the next step.

Step 2:- To get the measurement ID, go to your GA4 view and click on Admin to go to the admin section. You can find the property ID under the property settings of the admin section. Use this ID as the measurement ID in the tag configuration in the previous step.

Step 3:- Save the tag settings and You now have GA4 firing on your website.
Events in Google Analytics 4(GA4)
As discussed previously GA4 uses events to measure or collect the data from your website. Once you have set up the GA4 and GTM correctly, you can see that there are six default events in GA4. To view them browse your GA4 view then go to Engagement>Events. Here you will see the following events present by default:-
- Page view
- User engagement
- Scroll
- Session start
- First visit
- View search results
You can see these events firing on your website once you turn the Tag Assitant Preview Mode on from google tag manager. Now let us see how you can create your own custom GA4 event.
How to Create a Custom GA4 (Google Analytics 4) Event?
The custom event will enable you to pull the data using GTM into Magento 2 GA4 view. Suppose we want to create a custom event named cart_event for our GA4. Our event will fire up once a user visits the cart page. To create your own custom Magento 2 GA4(Google Analytics 4) event follow the steps below:-
Step 1:- First browse your Google Tag Manager page. Then you will see the option to create a new tag on the top right of your page. Click on it to create a new tag.
Step 2:- A popup window will open where you can name your tag and change the configuration as well as trigger settings. Change the name of the tag to “Cart event for GA4” and then click on Tag configuration.
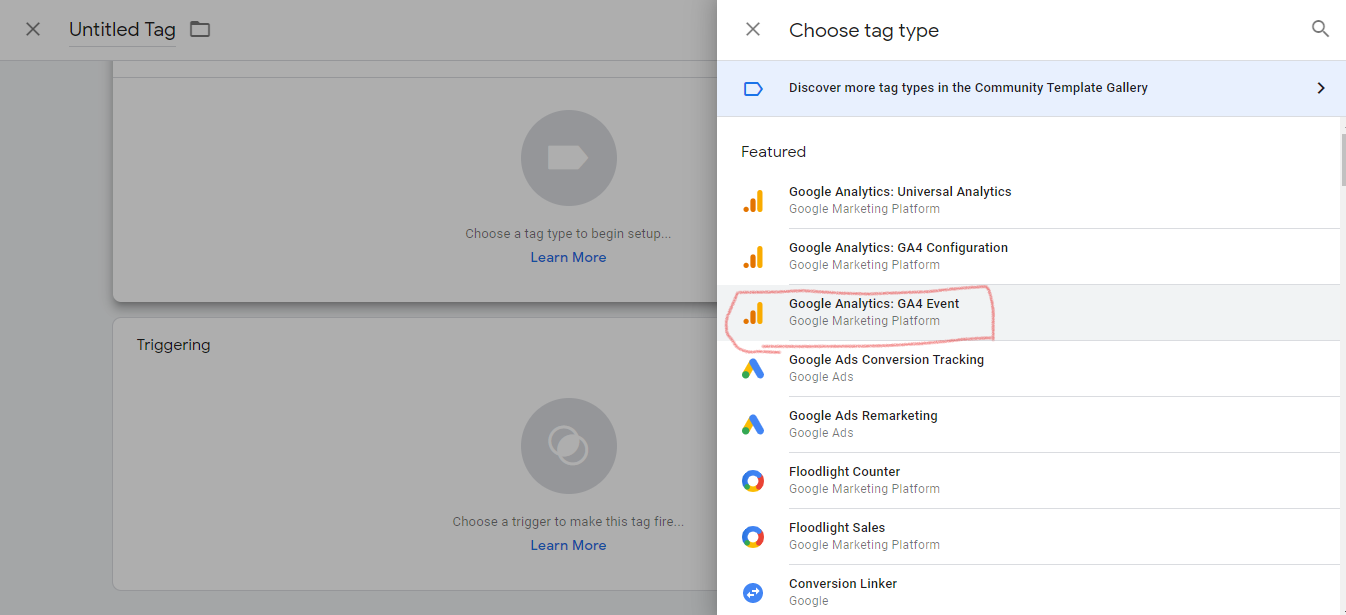
Step 3:- Another pop-up will open where you can select the tag type. Here we will have to select Google Analytics: GA4 event. Once you select it then a configuration popup will open.
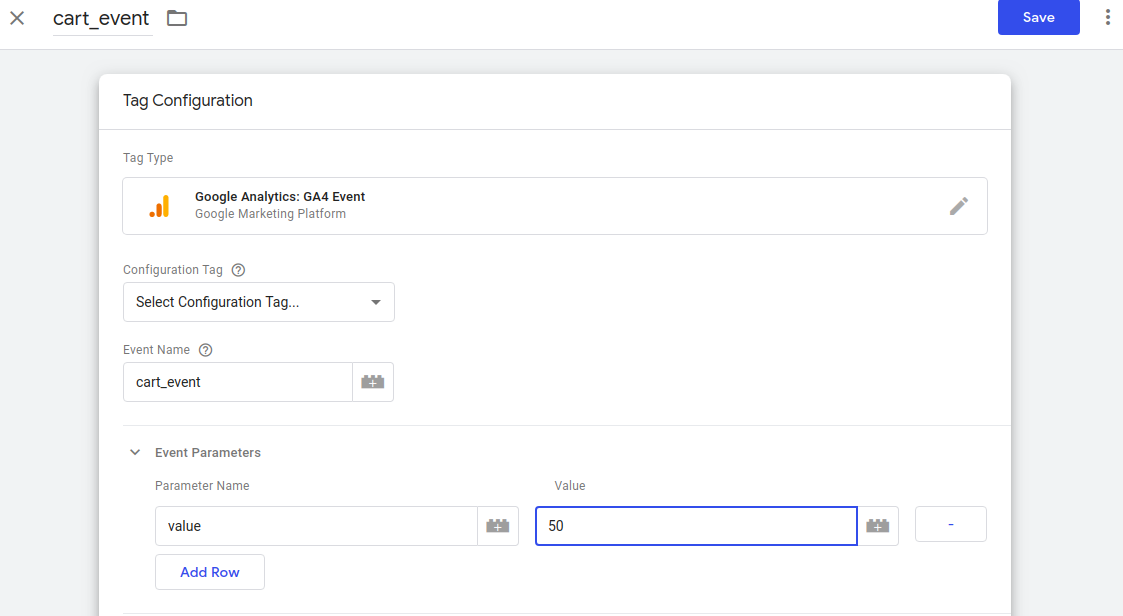
Step 4:- Select Google Analytics 4 from the Select configuration tag dropdown. Next, put “cart_event” in the event name input box. Now click on event parameters and put the parameter name as “value” and value as 50. Your tag configuration is now complete we will move on to the trigger settings.
Step 5:- Click on Triggering to set up our trigger. The trigger configuration page will open put the name as “Cart page view”. Now in the Trigger type select Page view. Select some page views from the radio buttons below. Set the fire trigger settings as follows:- Page URL in the first box then Contains in the second box and in the third box put “cart”. This means that our event will fire when the user visits a Page URL that contains cart in it. So we are targeting the cart page.

Step 6:- Now save your tag and you are ready for testing. Turn on the Tag Assitant Preview Mode from Google Tag Manager. To test go to your store and add any product to cart with an order value of 50 or above. Now you can see our cart_event firing in the Google Tag Manager.
Data Layer and Schema
Universal analytics schema is compatible with GA4 schema but the reverse is not true. Hence GA4 is backwards compatible. There are two different ways to go about setting up Google Tag Manager and send data to Google Analytics 4:-
- Setting up GA4 alongside universal analytics i.e if you already have data layers implemented for universal analytics.
- Freshly setup GA4 with the implementation of new data layers on your website.
Setting up Google Analytics 4 Events in Google Tag Manager
So if you already have universal analytics running and data layers implemented on your website then you can use the GA4 events in the Google Tag Manager to pass the data to analytics. In our implementation, we discovered that following the official documentation could be tricky unless you read the fine prints. However, you don’t have to worry, we will show you how to set up these events in the tag manager correctly.
First of all, make sure you have the GA4 configuration tag set up properly in the tag managers( follow the steps above). Next, follow the steps below to set up each event.
Data layer changes
You will have to add some events in your existing data layer code in order for this implementation to work. Since some events have a corresponding event in the universal analytics data layer we can directly use them to set up our GA4 events. However, some of the events are new hence they won’t be in your existing data layer code. Check out our Magento 2 Google Analytics 4 extension that will give you the data layer with all the changes to make it work successfully alongside universal analytics. If you do not want to go through all the hassles of setup, then we also provide the JSON file for the configurations that you can import in your tag manage and start using the wonderful features of GA4(Google Analytics 4)in your Magento 2 website.
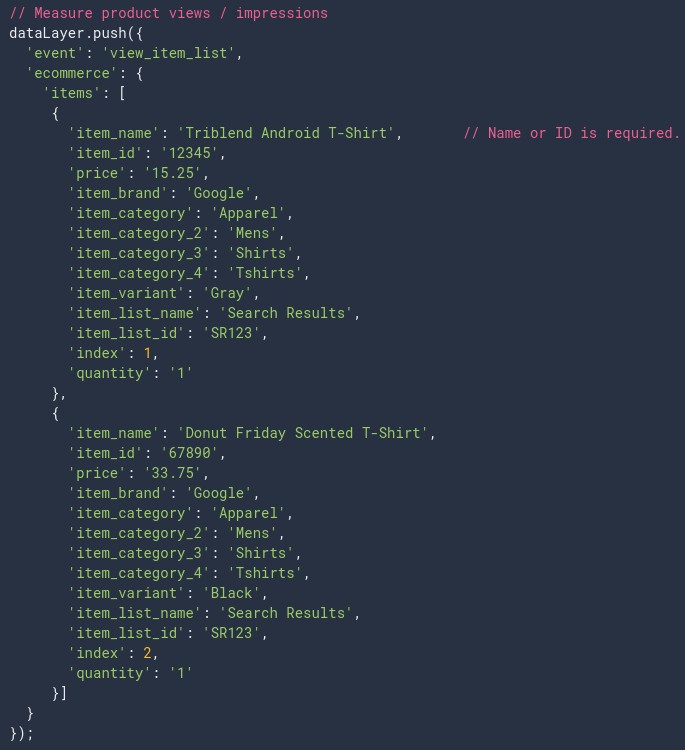
Measure product or item list views or impressions
GA4 Event name:- view_item_list
Data layer Sample(GA4):-
Setting up this event alongside Universal Analytics
Step 1:- Create a data layer variable as per your universal analytics. In our case, the values that we want to send are under ecommerce.impressions. So go to variables in tag manager and click on create a new variable.
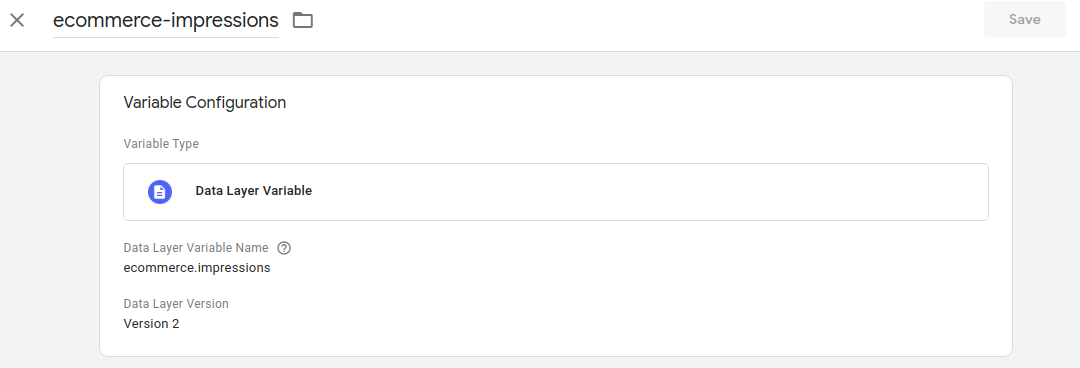
Variable Type:- select Data Layer variable
Data Layer Variable Name:- Enter the variable name according to your universal analytics data layer. The correct value in our case is ecommerce.impressions. Lastly, click save to save your variable.
Step 2:- We need to create a trigger in the tag manager as follows:-
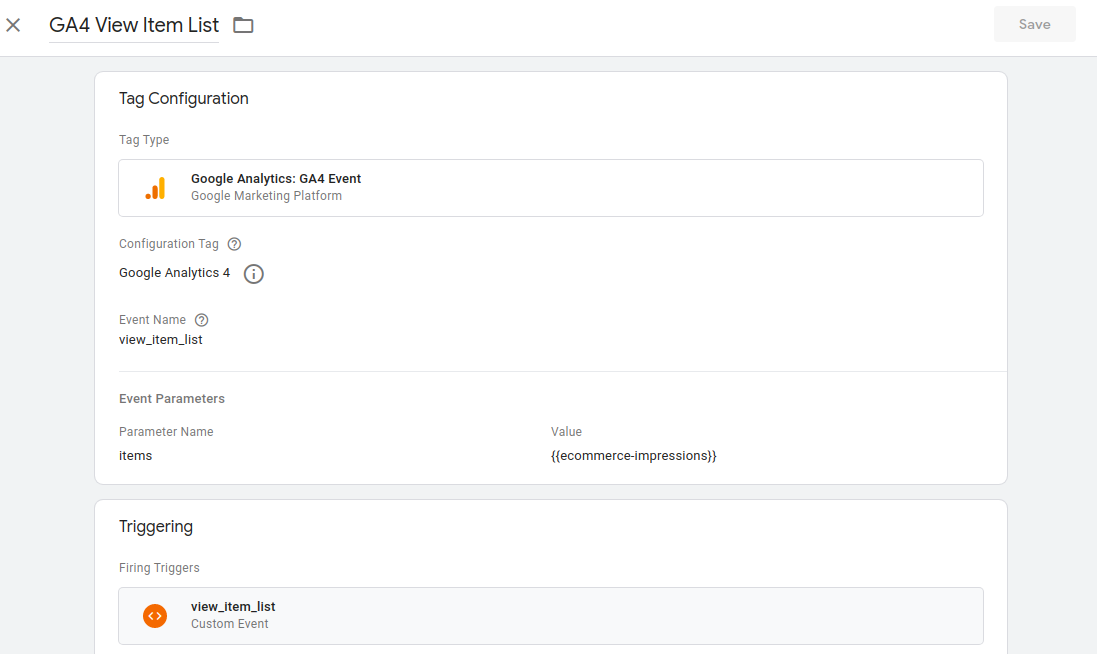
Tag Type:- Select GA4 event
Configuration Tag:- Google Analytics 4
Event Name:- view_item_list
Event Parameters:-
- Parameter Name:- items
- Value:- In the value, you will have to select the corresponding data layer variable. In this case, we have {{ecommerce-impressions}}
Step 3:- Setting up the trigger
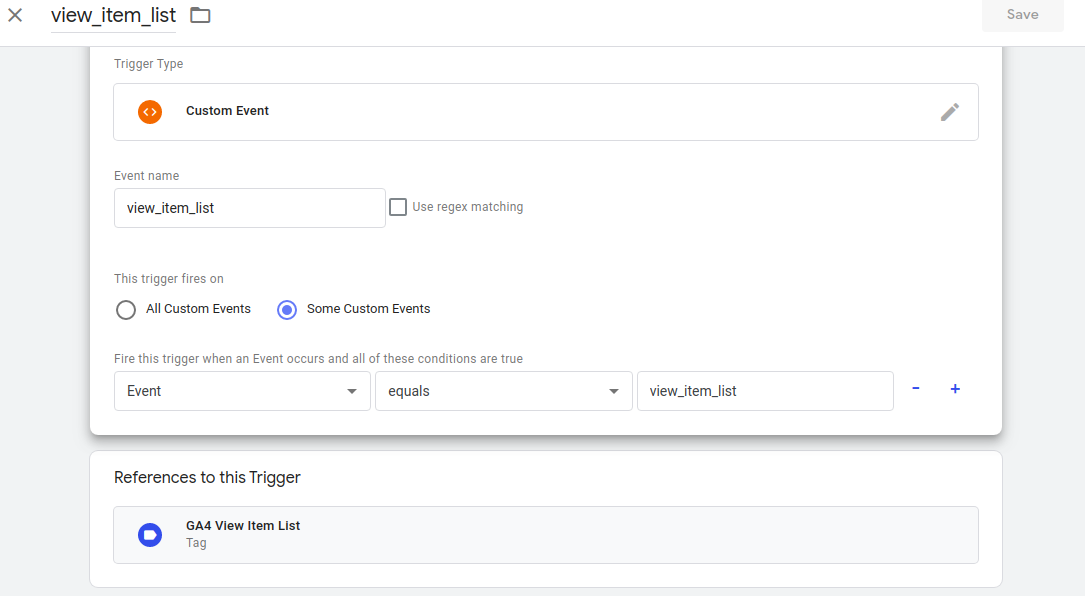
Create a trigger named view_item_list. We want our tag to fire when the data layer pushes this event.
Trigger Type:- Select custom event
Event name:- it should be view_item_list
This Trigger fires on:- Some Custom Events condition should be Event equals view_item_list
That’s all your event is now ready for testing.
Setting up this event when new GA4 data layers have been implemented
All the steps will remain pretty much the same as above. However, we only need to change the data layer variable name and create a new data layer variable as well.
Data Layer Variable Name:- The name should be ecommerce.items
Use {{ecommerce-items}} as the event parameter to utilize this data layer variable.
Now For all events listed below please follow the steps above with the parameters and values given for each event to complete the setup.
Measure product or item list clicks
GA4 Event name:- select_item
Corresponding Universal Analytics Event:- productClick
Data layer Sample(GA4):-
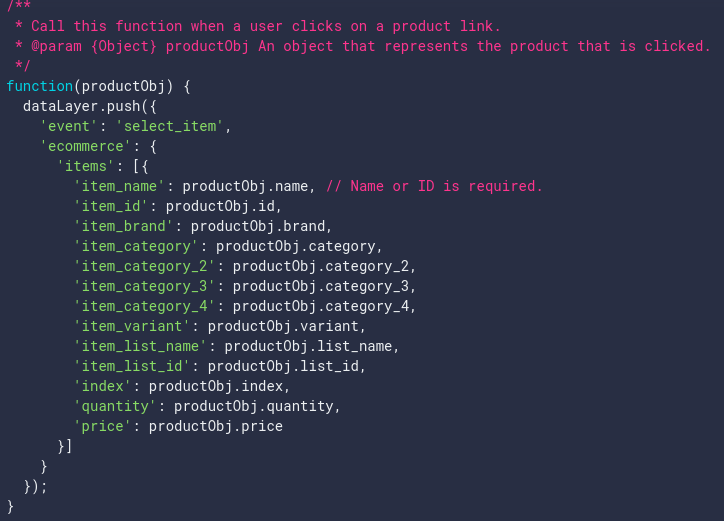
Setting up this event alongside Universal Analytics
Step 1:- Creating Data Layer Variables
We need to create two data layer variables to pass the correct information from the data layer to analytics.
- Data Layer Variable Name:- ecommerce.click.products
- Data Layer Variable Name:- ecommerce.click.actionField.list
Step 2:- Creating a new tag

Tag Type:- Select GA4 event
Configuration Tag:- Google Analytics 4
Event Name:- select_item
Event Parameters:- we will have to input two parameters or product details and product list name. Use the data layer variables created in step 1 as values.
- Parameter Name:- items
- Value:- {{ecommerce-click-product}}
- Parameter Name:- item_list_name
- Value:- {{ecommerce-product-click-list-name}}
Step 3:- Setting up the trigger
Create a trigger named productClick. We want our tag to fire when the data layer pushes this event. As we are using the universal analytics data layer so we will have to set up the trigger to the corresponding universal analytics event name.
Trigger Type:- Select custom event
Event name:- it should be productClick
This Trigger fires on- Some Custom Events condition should be Event equals productClick
Setting up this event when new GA4 data layers have been implemented
All the steps will remain the same except the parameters and the trigger settings. Set the event parameters to the following values:-
Event Parameters:- Use the event parameter as per the documentation and the new GA4 data layer.
- Parameter Name:- items
- Value:- {{ecommerce-items}}
Since we are using the new GA4 data layers we want our trigger to fire on the event that is pushed by the data layer. In this case its select_item.
Trigger Type:- Select custom event
Event name:- it should be select_item
This Trigger fires on- Some Custom Events condition should be Event equals select_item
Measure views or impressions of product or item details
GA4 Event name:- view_item
Data layer Sample(GA4):-
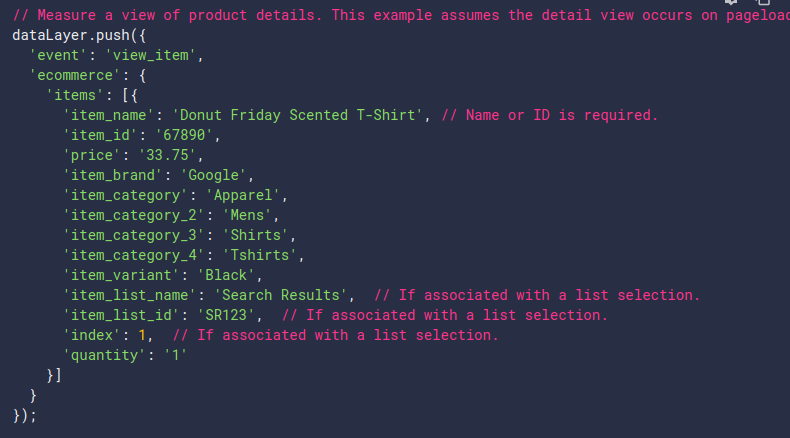
Setting up this event alongside Universal Analytics
Step 1:- Creating Data Layer Variables
We need to create two data layer variables to pass the correct information from the data layer to analytics.
- Data Layer Variable Name:- ecommerce.detail.products
- Data Layer Variable Name:- ecommerce.detail.products.0.price
Step 2:- Creating a new tag

Tag Type:- Select GA4 event
Configuration Tag:- Google Analytics 4
Event Name:- view_item
Event Parameters:- we will have to input two parameters. Use the data layer variables created in step 1 as values.
- Parameter Name:- items
- Value:- {{ecommerce-detail-products}}
- Parameter Name:- value
- Value:- {{ecommerce-product-detail-value}}
Step 3:- Setting up the trigger
Create a new trigger named view_item.
Trigger Type:- Select custom event
Event name:- it should be view_item
This Trigger fires on:- Some Custom Events condition should be Event equals view_item
Setting up this event when new GA4 data layers have been implemented
All the steps will remain the same except for the parameters. Set the event parameters to the following values:-
Event Parameters:- Use the event parameter as per the documentation and the new GA4 data layer.
- Parameter Name:- items
- Value:- {{ecommerce-items}}
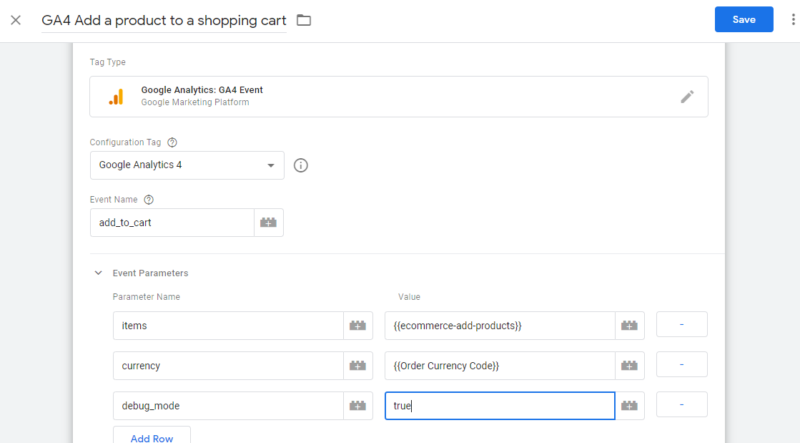
Measure additions or removals from a shopping cart
Add a product to a shopping cart
GA4 Event name:- add_to_cart
Corresponding Universal Analytics Event:- addToCart
Data layer Sample(GA4):-

Setting up this event alongside Universal Analytics
Step 1:- Creating Data Layer Variables
We need to create two data layer variables to pass the correct information from the data layer to analytics.
- Data Layer Variable Name:- ecommerce.add.products
- Data Layer Variable Name:- ecommerce.currencyCode
Step 2:- Creating a new tag
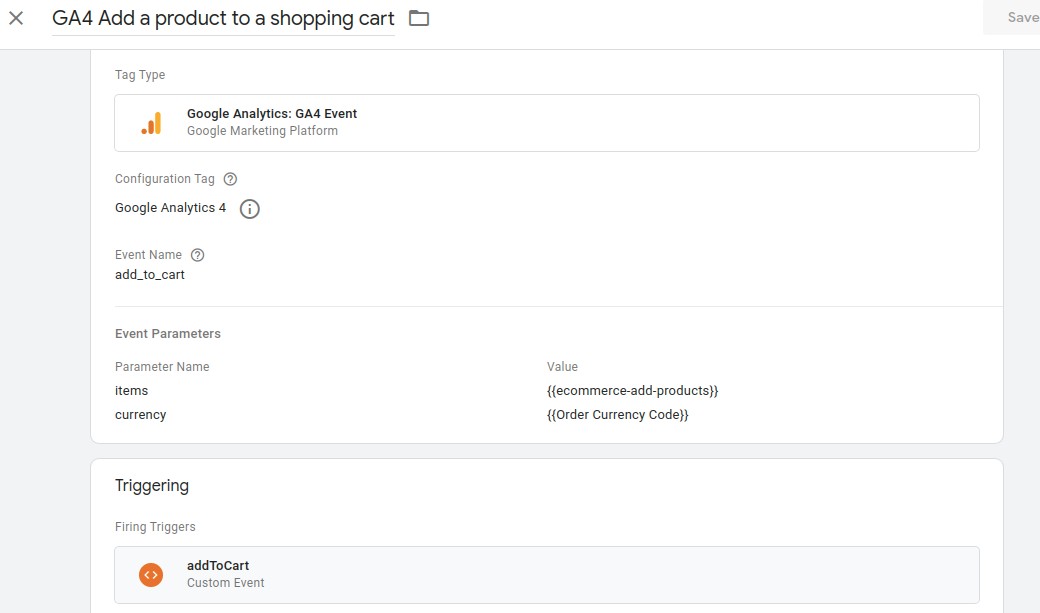
Tag Type:- Select GA4 event
Configuration Tag:- Google Analytics 4
Event Name:- add_to_cart
Event Parameters:- we will have to input two parameters. Use the data layer variables created in step 1 as values.
- Parameter Name:- items
- Value:- {{ecommerce-add-products}}
- Parameter Name:- currency
- Value:- {{order-currency-code}}
Step 3:- Setting up the trigger
Create a new trigger named addToCart.
Trigger Type:- Select custom event
Event name:- it should be addToCart
This Trigger fires on:- Some Custom Events condition should be Event equals addToCart
Setting up this event when new GA4 data layers have been implemented
All the steps will remain the same except for the parameters and the trigger. Set the event parameters and trigger configuration to the following values:-
Event Parameters:- Use the event parameter as per the documentation and the new GA4 data layer.
- Parameter Name:- items
- Value:- {{ecommerce-items}}
Trigger Type:- Select custom event
Event name:- it should be add_to_cart
This Trigger fires on- Some Custom Events condition should be Event equals add_to_cart
Remove a product from the shopping cart
GA4 Event name:- remove_from_cart
Corresponding Universal Analytics Event:- addToCart
Data layer Sample(GA4):-
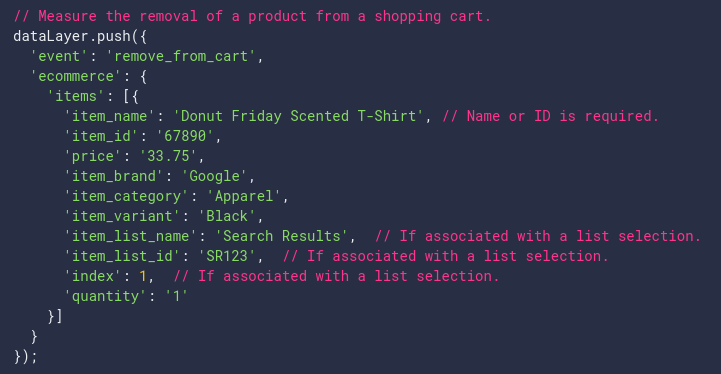
Setting up this event alongside Universal Analytics
Step 1:- Creating Data Layer Variables
We need to create two data layer variables to pass the correct information from the data layer to analytics.
- Data Layer Variable Name:- ecommerce.remove.products
Step 2:- Creating a new tag

Tag Type:- Select GA4 event
Configuration Tag:- Google Analytics 4
Event Name:- add_to_cart
Event Parameters:- We will have to input two parameters. Use the data layer variables created in step 1 as values. Since we have already created a data layer variable for currency code we will use that as a second parameter.
- Parameter Name:- items
- Value:- {{ecommerce-remove-products}}
- Parameter Name:- currency
- Value:- {{order-currency-code}}
Step 3:- Setting up the trigger
Create a new trigger named removeFromCart.
Trigger Type:- Select custom event
Event name:- it should be removeFromCart
This Trigger fires on- Some Custom Events condition should be Event equals removeFromCart
Setting up this event when new GA4 data layers have been implemented
All the steps will remain the same except the parameters and the trigger. Moreover, set the event parameters and trigger configuration to the following values:-
Event Parameters:- Use the event parameter as per the documentation and the new GA4 data layer.
- Parameter Name:- items
- Value:- {{ecommerce-items}}
Trigger Type:- Select custom event
Event name:- it should be remove_from_cart
This Trigger fires on- Some Custom Events condition should be Event equals remove_from_cart
Measure promotions
Measure promotion views or impressions
GA4 Event name:- view_promotion
Data layer Sample(GA4):-
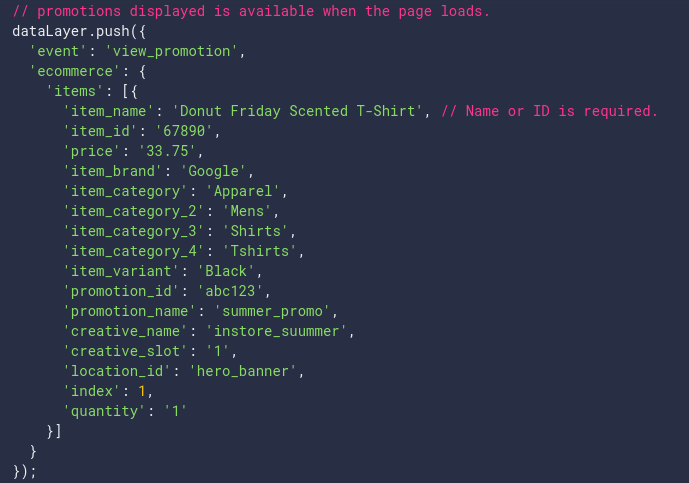
Setting up this event alongside Universal Analytics
Step 1:- Creating Data Layer Variables
We need to create a data layer variable to pass the correct information from the data layer to analytics.
- Data Layer Variable Name:- ecommerce.promoView.promotions
Step 2:- Creating a new tag
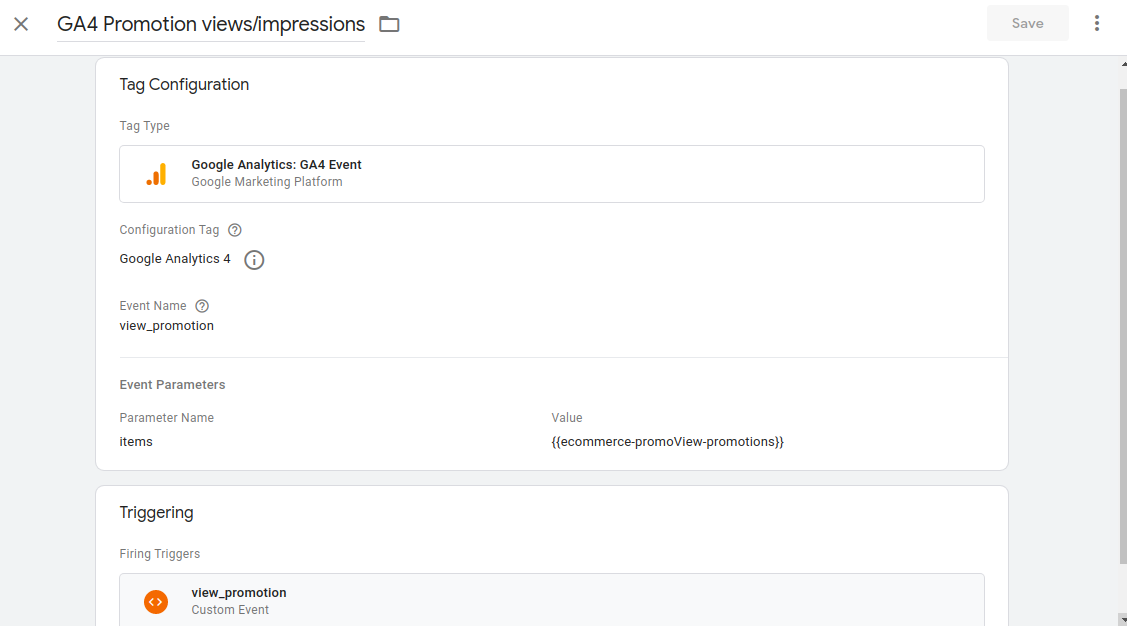
Tag Type:- Select GA4 event
Configuration Tag:- Google Analytics 4
Event Name:- view_promotion
Event Parameters:-Use the data layer variables created in step 1 as values.
- Parameter Name:- items
- Value:- {{ecommerce-promoView-promotions}}
Step 3:- Setting up the trigger
Create a new trigger named view_promotion.
Trigger Type:- Select custom event
Event name:- it should be view_promotion
This Trigger fires on- Some Custom Events condition should be Event equals view_promotion
Setting up this event when new GA4 data layers have been implemented
All the steps will remain the same except for the parameters. Also, set the event parameters to the following values:-
Event Parameters:- Use the event parameter as per the documentation and the new GA4 data layer.
- Parameter Name:- items
- Value:- {{ecommerce-items}}
Measure promotion clicks
GA4 Event name:- select_promotion
Corresponding Universal Analytics Event:- promotionClick
Data layer Sample(GA4):-
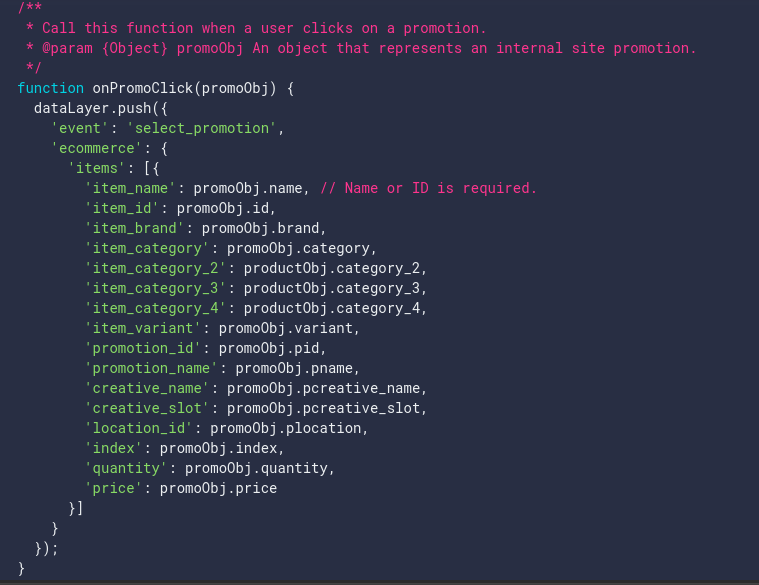
Setting up this event alongside Universal Analytics
Step 1:- Creating Data Layer Variables
We need to create a data layer variable to pass the correct information from the data layer to analytics.
- Data Layer Variable Name:- ecommerce.promoClick.promotions
Step 2:- Creating a new tag
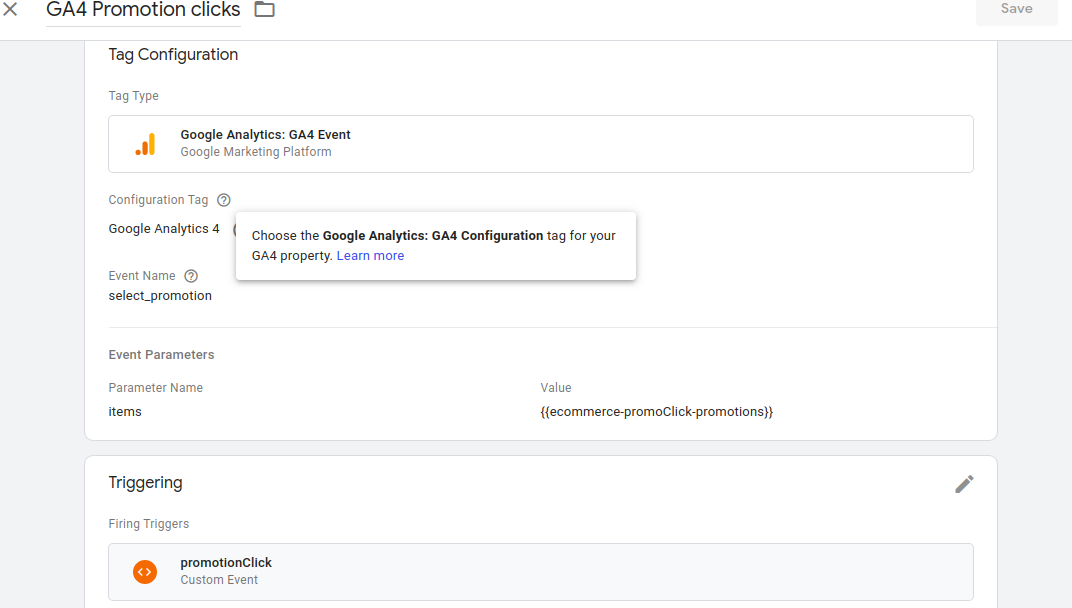
Tag Type:- Select GA4 event
Configuration Tag:- Google Analytics 4
Event Name:- select_promotion
Event Parameters:-Use the data layer variables created in step 1 as values.
- Parameter Name:- items
- Value:- {{ecommerce-promoClick-promotions}}
Step 3:- Setting up the trigger
Create a new trigger named promotionClick. Since we are pushing this event in the universal analytics data layer.
Trigger Type:- Select custom event
Event name:- It should be promotionClick
This Trigger fires on:- Some Custom Events condition should be Event equals promotionClick
Setting up this event when new GA4 data layers have been implemented
All the steps will remain the same except for the parameters and the trigger. Also, set the event parameters and trigger configuration to the following values:-
Event Parameters:- Use the event parameter as per the documentation and the new GA4 data layer.
- Parameter Name:- items
- Value:- {{ecommerce-items}}
Trigger Type:- Select custom event
Event name:- it should be select_promotion
This Trigger fires on:- Some Custom Events condition should be Event equals select_promotion
Measure a checkout
We will have to set up three events, in this case, begin_checkout, add_shipping_info, and add_payment_info. Let us look at them in detail.
BEGIN CHECKOUT
GA4 Event name:- begin_checkout
Data layer Sample(GA4):-
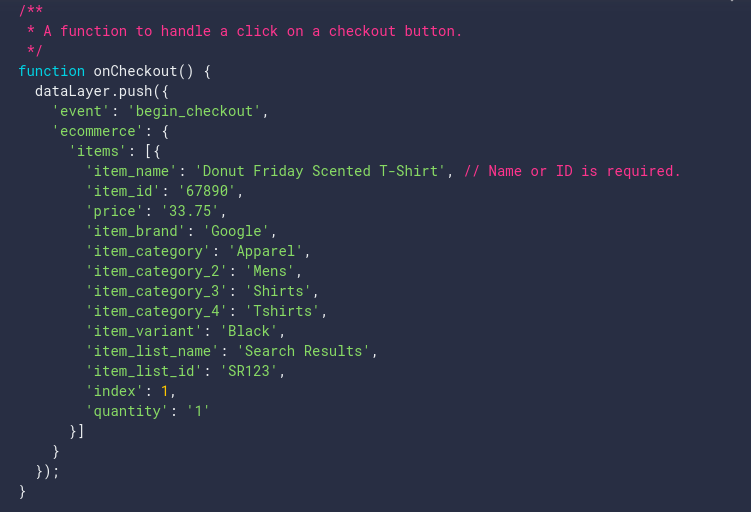
Setting up this event alongside Universal Analytics
Step 1:- Creating Data Layer Variables
We need to create a data layer variable to pass the correct information from the data layer to analytics.
- Data Layer Variable Name:- ecommerce.checkout.products
Step 2:- Creating a new tag
![]](https://www.scommerce-mage.com/blog/wp-content/uploads/2020/11/21.jpg)
Tag Type:- Select GA4 event
Configuration Tag:- Google Analytics 4
Event Name:- begin_checkout
Event Parameters:-Use the data layer variables created in step 1 as values.
- Parameter Name:- items
- Value:- {{ecommerce-checkout-products}}
Step 3:- Setting up the trigger
Create a new trigger that fires when our checkout event in universal analytics fires.
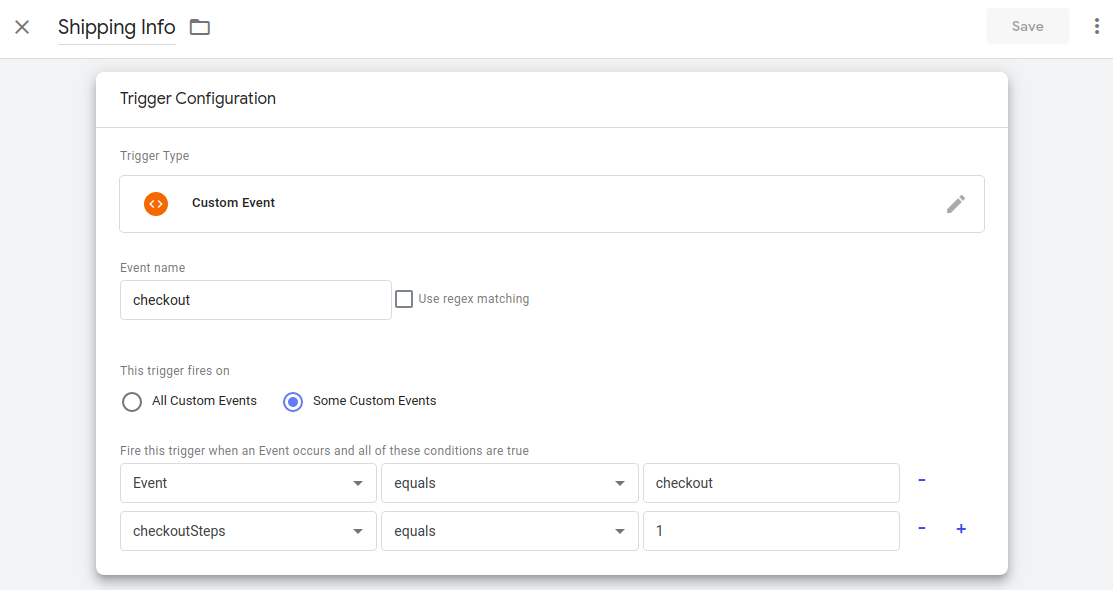
Trigger Type:- Select custom event
Event name:- it should be checkout
This Trigger fires on- Some Custom Events condition should be Event equals checkout
Then we need to add one more condition to verify the checkout steps
This Trigger fires on- Some Custom Events condition should be checkoutSteps equals 1
Setting up this event when new GA4 data layers have been implemented
All the steps will remain the same except the parameters and the trigger. Set the event parameters and trigger configuration to the following values:-
Event Parameters:- Use the event parameter as per the documentation and the new GA4 data layer.
- Parameter Name:- items
- Value:- {{ecommerce-items}}
Trigger Type:- Select custom event
Event name:- it should be begin_checkout
This Trigger fires on- Some Custom Events condition should be Event equals begin_checkout
ADD SHIPPING INFO
GA4 Event name:- add_shipping_info
Setting up this event alongside Universal Analytics
Step 1:- Creating Data Layer Variables
We need to create two data layer variables to pass the correct information from the data layer to the analytics. Moreover, do not create these variables if you have already created them in any of the previous steps. You can just reuse them.
- Data Layer Variable Name:- ecommerce.checkout.products
- Data Layer Variable Name:- ecommerce.checkout.option
Step 2:- Creating a new tag
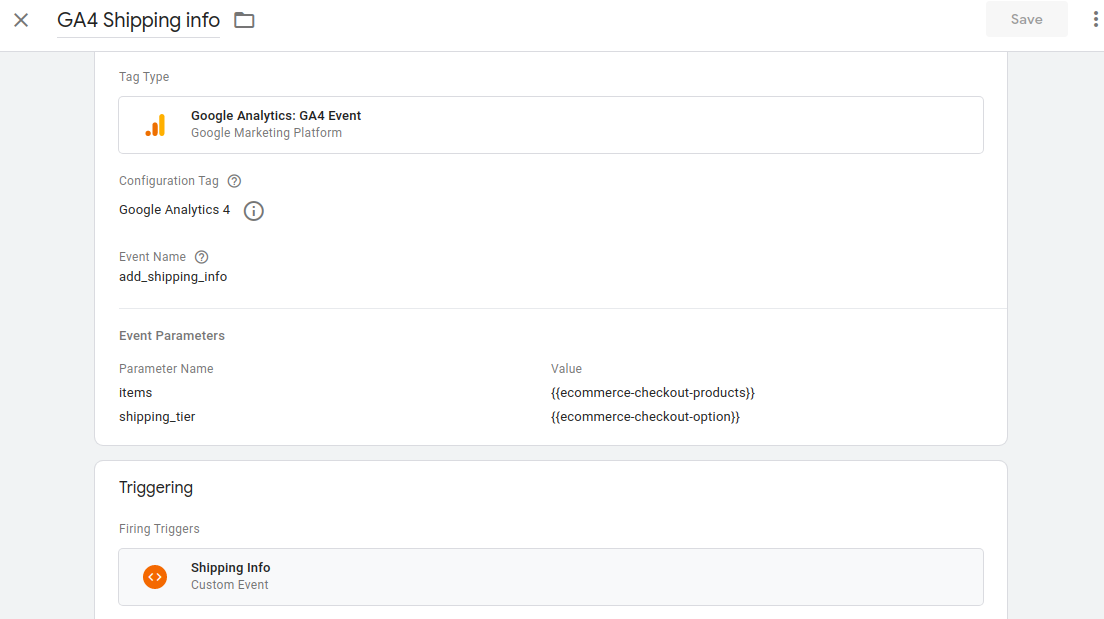
Tag Type:- Select GA4 event
Configuration Tag:- Google Analytics 4
Event Name:- add_shipping_info
Event Parameters:-Use the data layer variables created in step 1 as values.
- Parameter Name:- items
- Value:- {{ecommerce-checkout-products}}
- Parameter Name:- shipping_tier
- Value:- {{ecommerce-checkout-option}}
Step 3:- Setting up the trigger
Use the same trigger that we created in the begin checkout event configuration. Hence, i.e shipping_info event.
Setting up this event when new GA4 data layers have been implemented
All the steps will remain the same except for the parameters and the trigger. Also, set the event parameters and trigger configuration to the following values:-
Event Parameters:- Use the event parameter as per the documentation and the new GA4 data layer.
- Parameter Name:- items
- Value:- {{ecommerce-items}}
Trigger Type:- Select custom event
Event name:- It should be add_shipping_info
This Trigger fires on:- Some Custom Events condition should be Event equals add_shipping_info
ADD PAYMENT INFO
GA4 Event name:- add_payment_info
Setting up this event alongside Universal Analytics
Step 1:- Creating Data Layer Variables
We need to create two data layer variables to pass the correct information from the data layer to the analytics. Also, do not create these variables if you have already created them in any of the previous steps. You can just reuse them.
- Data Layer Variable Name:- ecommerce.checkout.products
- Data Layer Variable Name:- ecommerce.checkout.option
Step 2:- Creating a new tag
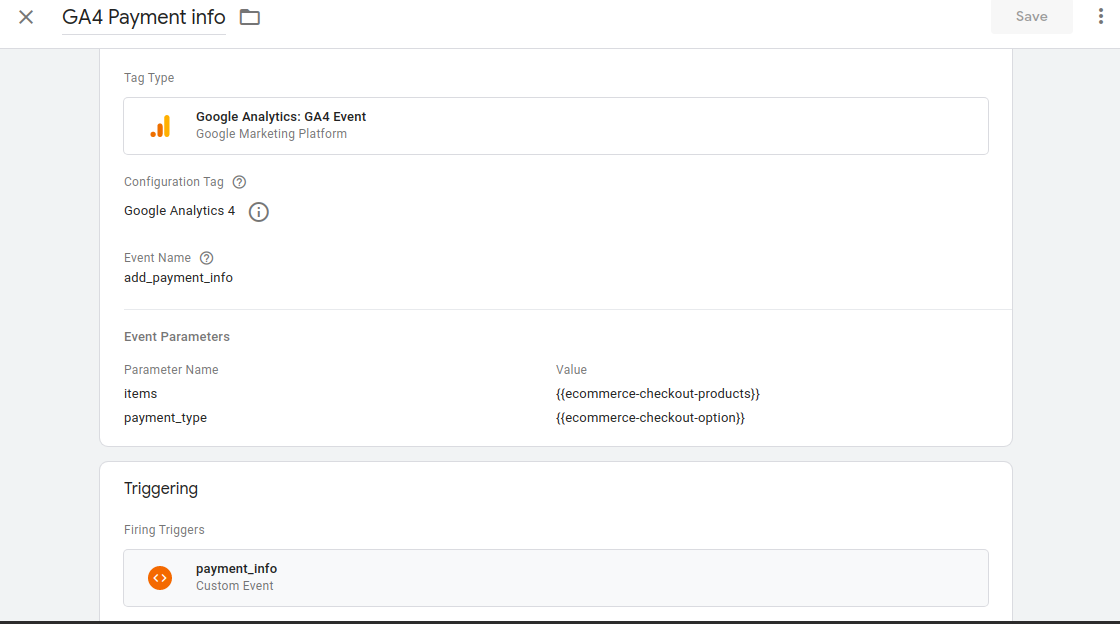
Tag Type:- Select GA4 event
Configuration Tag:- Google Analytics 4
Event Name:- add_payment_info
Event Parameters:-Use the data layer variables created in step 1 as values.
- Parameter Name:- items
- Value:- {{ecommerce-checkout-products}}
- Parameter Name:- payment_type
- Value:- {{ecommerce-checkout-option}}
Step 3:- Setting up the trigger
Use the same trigger that we created in the begin checkout event configuration. Hence i.e shipping_info event.
Setting up this event when new GA4 data layers have been implemented
All the steps will remain the same except the parameters and the trigger. Also, set the event parameters and trigger configuration to the following values:-
Event Parameters:- Use the event parameter as per the documentation and the new GA4 data layer.
- Parameter Name:- items
- Value:- {{ecommerce-items}}
Trigger Type:- Select custom event
Event name:- it should be add_payment_info
This Trigger fires on:- Some Custom Events condition should be Event equals add_payment_info
Measure purchases
GA4 Event name:- purchase
Data layer Sample(GA4):-

Setting up this event alongside Universal Analytics
Step 1:- Creating Data Layer Variables
We need to create several data layer variables to pass the correct information from the data layer to the analytics. Also. do not create these variables if they already exist in your variables list.
Data Layer Variable Name:-
- ecommerce.purchase.products
- ecommerce.purchase.actionField.id
- ecommerce.purchase.actionField.affiliation
- ecommerce.purchase.actionField.revenue
- ecommerce.purchase.actionField.tax
- ecommerce.purchase.actionField.shipping
- ecommerce.purchase.actionField.coupon
- ecommerce.currencyCode
Step 2:- Creating a new tag

Tag Type:- Select GA4 event
Configuration Tag:- Google Analytics 4
Event Name:- purchase
Event Parameters:-Use the data layer variables created in step 1 as values.
- Parameter Name:- items
- Value:- {{ecommerce-purchase-products}}
- Parameter Name:- transaction_id
- Value:- {{order Id}}
- Parameter Name:- affiliation
- Value:- {{purchase affiliation}}
- Parameter Name:- value
- Value:- {{order value}}
- Parameter Name:- tax
- Value:- {{purchase-tax}}
- Parameter Name:- shipping
- Value:- {{purchase-shipping}}
- Parameter Name:- coupon
- Value:- {{purchase-coupon}}
- Parameter Name:- currency
- Value:- {{Order Currency Code}}
Step 3:- Setting up the trigger
Create a new trigger named purchase.
Trigger Type:- Select custom event
Event name:- it should be purchase
This Trigger fires on:- Some Custom Events condition should be Event equals purchase
Setting up this event when new GA4 data layers have been implemented
All the steps will remain the same except for the parameters. Also, set the event parameters to the following values:-
Event Parameters:- Use the event parameter as per the documentation and the new GA4 data layer.
- Parameter Name:- items
- Value:- {{ecommerce-items}}
Measure refunds
GA4 Event name:- refund
Data layer Sample(GA4):-
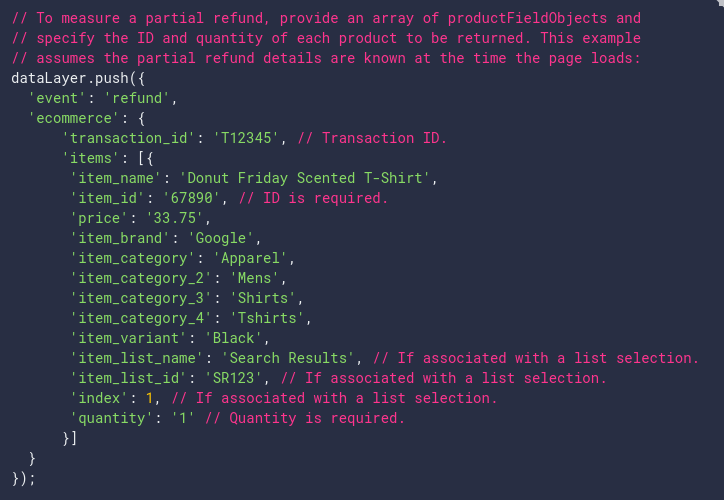
Setting up this event alongside Universal Analytics
Step 1:- Creating Data Layer Variables
We need to create several data layer variables to pass the correct information from the data layer to the analytics. Do not create these variables if they already exist in your variables list.
- Data Layer Variable Name:- ecommerce.refund.products
Step 2:- Creating a new tag
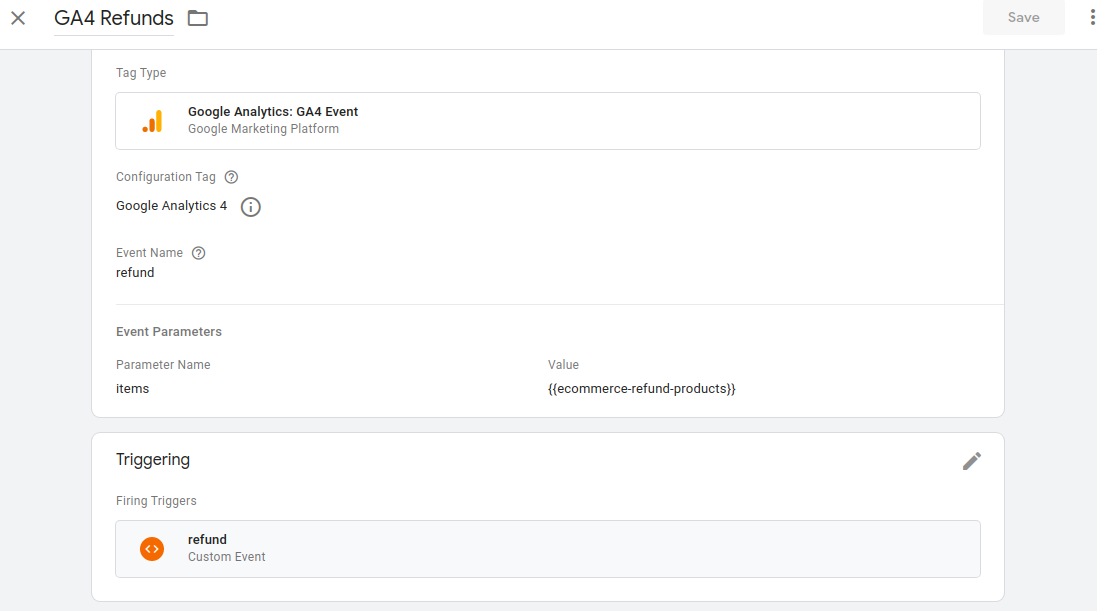
Tag Type:- Select GA4 event
Configuration Tag:- Google Analytics 4
Event Name:- refund
Event Parameters:-Use the data layer variables created in step 1 as values.
- Parameter Name:- items
- Value:- {{ecommerce-refund-products}}
Step 3:- Setting up the trigger
Create a new trigger named refund.
Trigger Type:- Select custom event
Event name:- it should be refund
This Trigger fires on:- Some Custom Events condition should be Event equals refund
Setting up this event when new GA4 data layers have been implemented
All the steps will remain the same except for the parameters. Also, Set the event parameters to the following values:-
Event Parameters:- Use the event parameter as per the documentation and the new GA4 data layer.
- Parameter Name:- items
- Value:- {{ecommerce-items}}
Troubleshoot
Test all the tags by going into the Tag Assitant Preview Mode of Google Tag Manager. Furthermore, open your analytics window and scroll down in the left menu and you will find an option named Debug view. Click on it and you will be able to see all the events firing in real-time. You can use it to debug any errors. If you do not see events coming into debug view then you can use three different methods to fix it:-
- Use Google Analytics Debugger extension. Go to your website and turn this extension on. Now if you browse your website you will be able to see all the events coming into GA4 Debug view.
- You can add the parameter debug_mode: true to your GA4 configuration tag. It will allow you to view events firing in Debugview without the help of Google Tag Manager.
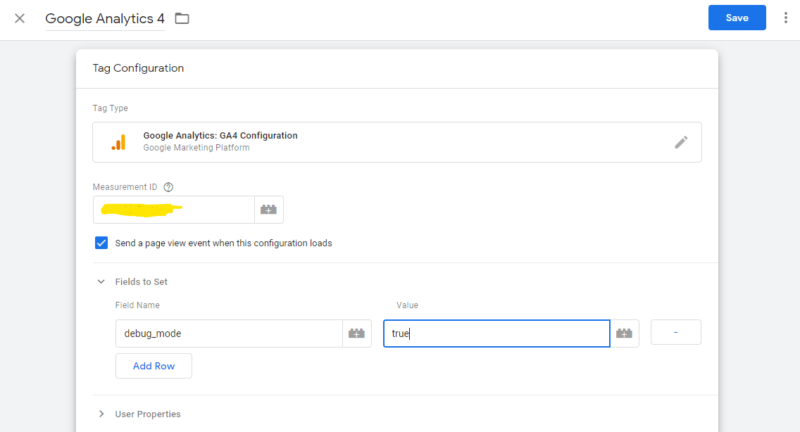
- Add debug_mode: true parameter with specific events that you want to track in GA4 Debug view.


Keep In Mind
In our implementation, we discovered that if all the parameters are not used correctly in the tag setup then the data won’t flow into the analytics. We hope that this article would have helped in successfully setting up Magento 2 Google Analytics 4.
Check out our GA4 Extension now for a quick hassle-free setup. The extension fully compatible with both Breeze theme and Hyvä theme. You will get a JSON file that you can directly import in GTM to get a working setup instantly. Please refer to the video below:-
GA4 Implementations with GTM:-
Magento 2 Google Tag Manager Enhanced Ecommerce Tracking
GA4 Implementation with GTAG:-
More on GA4…..
- How to Debug Magento 2 Google Analytics 4 (GA4) Like a Pro?
- How to Understand and Avoid Report Thresholding in Google Analytics 4 (GA4)?
- How to Create Transactions Report in Google Analytics 4 (GA4)?
- Missing Magento 2 Transactions in Google Analytics 4 (GA4): Solved !!
- How to Use and Customize Standard Reports in GA4?
- How to Set Up Magento Server Side Tagging for GA4 Using GTM?
- How to Implement GTM Consent Mode in Magento?